(Guardian is now G and not T) Tag: Visual edit |
(more precise info on when guardian shows up) Tag: Visual edit |
||
| Line 19: | Line 19: | ||
Your personal HP Bar appears below the enemies and contains several bars which are important to understand. |
Your personal HP Bar appears below the enemies and contains several bars which are important to understand. |
||
| − | [T]([G]): Signifies that your guardian is recharged and ready to battle. The |
+ | [T]([G]): Signifies that your guardian is recharged and ready to battle. The Guardian is a drop from a Mystic Guardian in area 5 of Act 1. (As a matter of fact, in Black Edition, the guardian is denoted [G] - the screen-shot is from an earlier version) |
[Green Bar]: This is a visual representation of your health bar, when you are below a certain threshold, the UI will turn red, warning you to heal. |
[Green Bar]: This is a visual representation of your health bar, when you are below a certain threshold, the UI will turn red, warning you to heal. |
||
Revision as of 21:53, 6 July 2018
Battle
Battle
You can battle with enemies in a few different ways. The most common way is to search for enemies in each stage to put yourself into battle. It is also possible for enemies to appear during Events (e.g., Gladiator, Dragonrider, etc). The third option is to go to the Arena and battle, which will be mentioned in Sanctuary Arena
Battle Hub
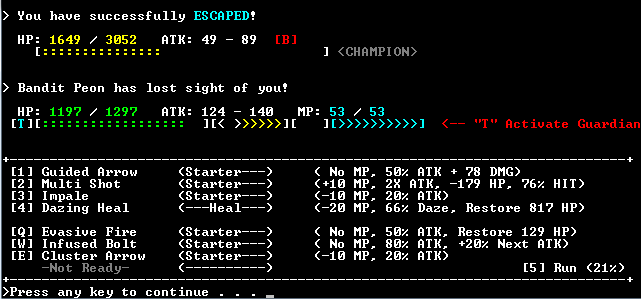
Let us start by explaining the battle hub from top to bottom. The line with the ">" explains the current situation in battle. In the picture above, The player is running away from the enemy and succeeded.
The HP bar on the top belongs to the enemy while yours is just below it. At first it may seem confusing, but the difference between your HP bar and the enemies is that you can see your own MP, which you will use to perform special abilities. Take away all the enemy's health to win the battle, with the chance to earn exp, gold, and items.
Affixes like <CHAMPION> make the enemy stronger and harder to kill. Affixes can stack upon each other with a maximum of three affixes on the enemies. To see a list of all possible affixes, visit Sanctuary Affixes. It would be wise to know which affixes are too dangerous to battle and make a dash when possible.
We will touch up on Status effects later in this tutorial.
Your personal HP Bar appears below the enemies and contains several bars which are important to understand.
[T]([G]): Signifies that your guardian is recharged and ready to battle. The Guardian is a drop from a Mystic Guardian in area 5 of Act 1. (As a matter of fact, in Black Edition, the guardian is denoted [G] - the screen-shot is from an earlier version)
[Green Bar]: This is a visual representation of your health bar, when you are below a certain threshold, the UI will turn red, warning you to heal.
[Yellow Bar]: This is the battle performance bar. Every time you perform an action other than healing, the bar increases by 1 point. The maximum stack is 30 points. At the end of the battle, this bar determines how much extra EXP the player can obtain for continuing a battle without healing.
[ULT Bar]: This is the ultimate bar. Every time you successfully link together a set of attacks, a letter will light up. When ULT lights up, your ultimate is ready to use.
[Cyan Bar]: This is the energy bar for your guardian. When the bar is filled, you can bring out your guardian again. The reason you would want to bring out your guardian is to heal yourself in the background, while your guardian is distracting the enemy. The guardian will distract the enemy for six turns, leaving you an ample amount of time to heal.
Up next is the attack bar.
Attack
You can choose from a variety of attacks from [1]-[4] and [Q]-[R]. To the right of the corresponding input, you can see how much HP, MP, Accuracy and damage, the attacks may have.
[1]-[3] are normal attacks that have the option to stack on each other. As you perform combos by linking your attacks, the damage done to the enemy multiplies.
[Q]-[E] are special attacks that damage the enemy with healing bonuses. These attacks will not hurt the battle performance bar but will hurt your overall battle if it takes too long to kill the enemy. The reason is because every time you perform one of these attacks that have healing bonuses, the maxium hp you can recover from using your normal healing ability diminishes. It is recommended to only use these moves when the player is battling enemies which would not take too long to kill.
[4] is a healing option which allows your character to recover a portion of their hp. Use this sparingly as the amount of recoverable HP decreases every time you use it. The amount recoverable will return to normal at the end of the battle. When the player's ULT Bar is filled, this command changes to a move called Rejuvenate, which heals for a lot more than normal.
Healing is special in that you can get rid of status effects cast on the player. The only status you cannot heal yourself out of is ensnared. Another command will be used to cure that ailment.
[R] is a special option which lights up when the player's ULT Bar is filled. There are two different ultimates that can appear on the screen. There is a common ultimate which deals damage based on your ATK stats. The rarer ultimate deals damage based on the amount of HP the enemy has. The ultimates can be carried over to the next battle if you can finish the current enemy without using an ultimate.
Players can use ultimates when they are cursed or ensnared, except it will NOT do any damages to the enemy.
Next up is the running option [5]
Running
[5]: When the enemy is too tough, you can always try to run from the battle. You will not gain any exp, gold, or complete quests if you choose this option however. To the right of the Run command, is the percentage of success in running from the enemy.
When the player is [ENSNARED], the run option is changed to [Break Free] which will get rid of entanglement.
When the Ultimate is ready to use, the run command disappears because the player is not allowed to run if an ultimate is ready.
Status Effects
Status Effects
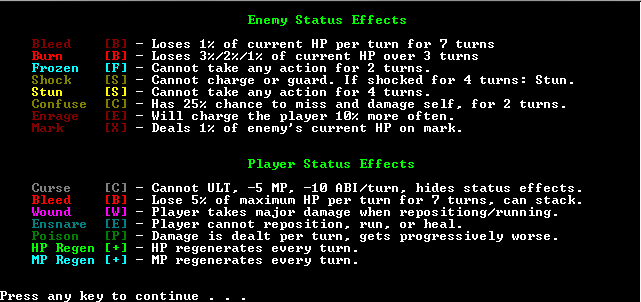
Here are the current status effects both you and the enemy can inflict on each other with an explanation on the right. On the battle screen you will see the abbreviated terms contained in the [ ] only, so it is a good idea to know what each effect does.
Boss Fights
Boss/Enemy Meters
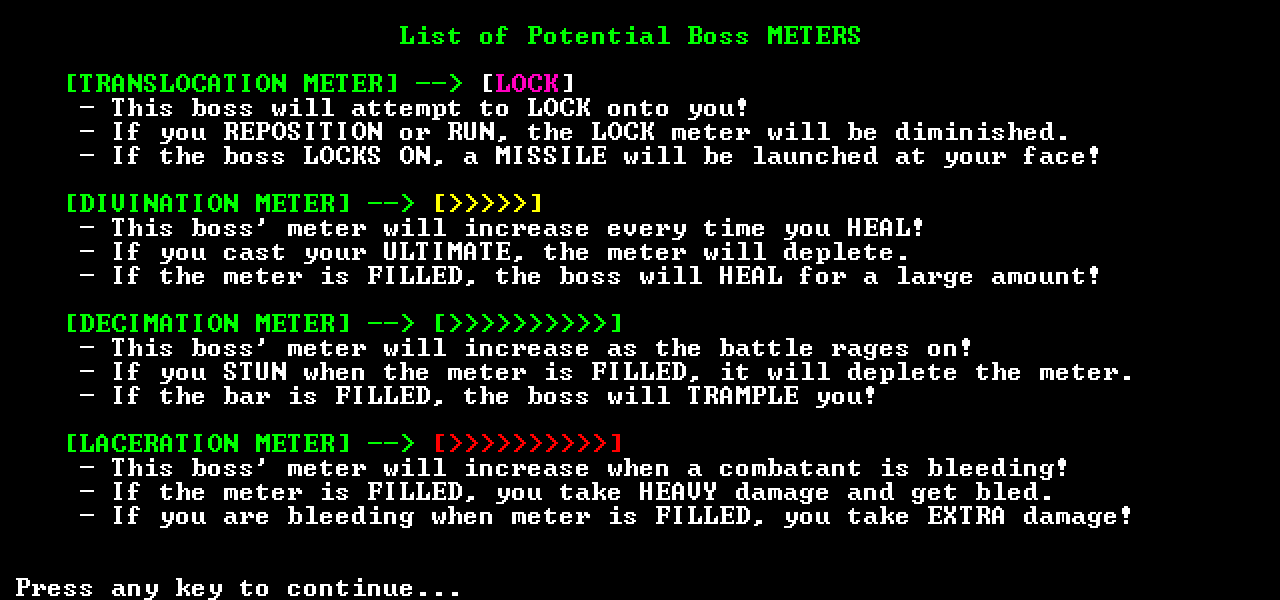
Boss fights as well as stronger enemies will have a special bar to the right of the HP Bar which fills up. Horrible things happen if you allow the enemy to fill these bars up
List of Enemy Meters
- Translocation Meter
- Divination Meter
- Decimation Meter
- Laceration Meter